'ps-monitor
'Project Name : Powershell monitoring tool
Latest update : September 16, 2013
Version : 1.0
Download : ps-monitor.7z
'Description :
This Powershell tool will let you take snapshots of your system and compare them with a new set of snapshots and output the diff in html format. This tool also enables you to do live file system changes monitoring of any locations and filter the output.Powershell is very powerful and if you take the time to understand the basics you can come up with a lot of crazy ideas. I decided to create this monitoring tool to apply some of the functionalities I've learned by reading "Learn Windows PowerShell in a Month of Lunches"
'Features :
I broke down the tool's features into 5 different parts;[1]Create default snapshots
[2]Create custom snapshots
[3]Compare default snapshots
[4]Compare custom snapshots
[5]File Monitoring
|Create\compare default snapshots|
This option will take 11 snapshots of your system which are considered *critical* with high chances of being hit by infected files/configuration.
The following default snapshots will be taken;
  c:\
  c:\windows\System32
  $env:temp
  C:\Windows\System32\drivers\etc
  $env:appdata
  $env:allusersprofile + cd '.\Application data' (winxp)
  $env:localappdata (win vista/7)
  $env:programfiles
  $env:windir
  Get-WmiObject -Class Win32_NetworkAdapterConfiguration
  get-service
  get-process
The idea here is to take these snapshots when you are running a clean system so whenever something bad hit your computer, you can quickly take a new set of snapshots by using the option "Compare Default snapshots", the script will then run the diff command against both snapshots and write down the output in html format.
Here's how it works;
  #root

    get-childitem c:\ >> diff.txt -force
    diff $(Get-Content root.txt) $(Get-Content diff.txt) |
    Where-Object { $_.SideIndicator -eq '=>' } | ConvertTo-HTML | Out-File root.html
By using get-childitem we are listing all items and child items from the specified path. Since we need to compare the original snapshot of [c:\] against a new snapshot of the same location, we will be storing the items inside diff.txt Now that we have both snapshots, the original [root.txt] and the new one [diff.txt], we can run the diff command!
Diff command will compare both snapshots and list any differences found inside root.html
root.html output;
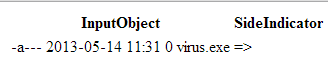
In this example, we can clearly see that something new reside inside [c:\] and yes its a nasty virus! The idea is to quickly analyze each critical directories against a clean snapshot so you can easily know what happened.
|Create\compare custom snapshots|
By using this option you can take a snapshot of any directory from your system. If you wish you can enable the recursive option (list all sub-folders) for deep analyzing.
This is how it work;
    Write-Host "Would you like to use the -recurse option? (list all sub-folders)"
    $q = Read-Host "y/n"
    Write-Host "Creating snapshot of " -nonewline; Write-Host "$path" -foregroundcolor red
    if ($q -eq "y") {
    cd $path
    $recurse = get-childitem -force -recurse
    cd $p
    $date >> $name
    $recurse >> $name
    }
    else {
    cd $p
    $date >> $name
    get-childitem -force $path >> $name
    }
This is really basic stuff, gci will store the items inside $name which is the name of the snapshot given by the user. $path is the target of the snapshot given by the user.
Now that we have a custom snapshot, we can compare the items against another snapshot from the same target location;
  #compare custom snapshots

    Function cmp {
    Write-Host "Enter the "-nonewline; Write-Host "full path " -foregroundcolor red -nonewline; Write-Host "of your snapshots directory"
    $p = Read-Host "?"
    Write-Host "Which snapshot would you like to compare? ; example snapshot.txt"
    Write-Host "[extension is needed]" -foregroundcolor red
    $name = Read-Host "?" #snapshot name is needed to parse the [path] with "gc"
    cd $p #cd to snapshot directory so we can "gc" the selected snapshot
    $gc = gc $name #storing the snapshot content inside $gc with get-content
    $path = $gc -match "Directory" #only need "Directory" string from all the content and store this string inside $path
    $target = "$path".substring(15) #now I only need the target itself without "Directory:" - substring will do the job

  #$target will give us the full path of the original snapshot and we can now take a new snapshot of the exact same location and compare it!

    Write-Host "Would you like to use the -recurse option? (list all sub-folders)"
    $q = Read-Host "y/n"
    Write-Host "Creating snapshot of " -nonewline; Write-Host "$target" -foregroundcolor red
    if ($q -eq "y") {
    cd $target
    $recurse = get-childitem -force -recurse
    cd $p
    $date >> diff.txt
    $recurse >> diff.txt
    }
    else {
    cd $p
    $date >> diff.txt
    get-childitem -force $target >> diff.txt
    }
    Write-Host "Comparing [$name] snapshot with [$name] snapshot taken on $date" -foregroundcolor green
    cd $p
    $output = $name -replace ".txt", ".html" #switching extention so the output will be in html format with a custom name
    diff $(Get-Content $name) $(Get-Content diff.txt) | Where-Object { $_.SideIndicator -eq '=>' } | ConvertTo-HTML | Out-File $output
    remove-item diff.txt -force #removing diff snapshot because we only need the html output
This part was quite fun to code because in order to compare a snapshot the tool has to snap a new one. Since we are comparing custom snapshots, it has no way to know what was the original target location of the snapshot. Lets say I took a snapshot of [C:\Downloads] and now I want to compare my original snapshot with the new one. There's two ways of doing this, the first one would be to ask the user to input the original target location of the snapshot, which would be [C:\Downloads] but lets face it that's not cool. Instead I used the information already inside the original snapshot to harvest the target location and then use it as $target.
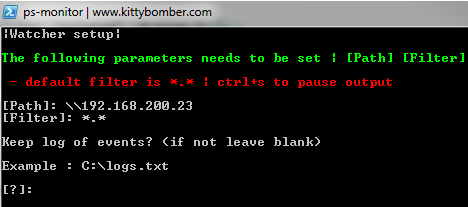
|File monitoring|
If you wish to do some live file monitoring of any directories this is the option for you. The current events supported by the watcher are;
"Changed | Created | Deleted | Renamed"
  #Live monitoring events

    $watcher = New-Object System.IO.FileSystemWatcher
    $watcher.Path = $searchPath
    $watcher.Filter = $filter
    $watcher.IncludeSubdirectories = $true
    $watcher.EnableRaisingEvents = $true


    $changed = Register-ObjectEvent $watcher "Changed" -Action {
    write-host "Changed: $($eventArgs.FullPath)"
    }
    $created = Register-ObjectEvent $watcher "Created" -Action {
    write-host "Created: $($eventArgs.FullPath)"
    }
    $deleted = Register-ObjectEvent $watcher "Deleted" -Action {
    write-host "Deleted: $($eventArgs.FullPath)"
    }
    $renamed = Register-ObjectEvent $watcher "Renamed" -Action {
    write-host "Renamed: $($eventArgs.FullPath)"
    }
Live monitoring could be useful for analazing how malwares spread inside your system, you could set the watcher to monitor [c:\] and apply *.exe as filter, as a result you would see where the malware is dropping is executable. There are many more scenarios where this kind of monitoring would be useful but that is up to you to find one.